Showing posts with label Android Hacks. Show all posts

Sunday, February 17, 2013

How to Increase Battery Backup & Performance of Android Phone.

Then I tell you that some of the below mentioned tips will work on your phone even if  you have not Rooted your phone.

Tips For Root Users

Use Power Saver App

Download, install and use Power Saver App. This will make your battery long lasting, and it’s working like charm. I have tried it.

 Use Ram Expander

Download, install and use Ram Expander. This application will expand your RAM means not much stress on Stock Ram and hence less battery usage, may work on some devices. Just check if this is working for you or not and comment below with your device name.

Use Seeder App

Download, install and use Seeder App. The seeder app will try to reduce lags on your Android device. So less lags means less battery usage.

Remove Stock Launcher

I have seen many of users just download any other browser from playstore and don’t use the stock launcher. But as the stock launcher is also there so it consumes the battery. So better you uninstall the stock browser. First make any other downloaded launcher as default browser and then uninstall the stock launcher with the help of titanium backup or any other app. Also Remove Stock Launcher from system folder (means delete that in /system/app) and add better launcher like launcher pro, go launcher (don’t install adw launcher, it consumes to much battery).

Upgrade to Custom Rom

If there is any custom Rom available for your Android device, then don’t think more and just upgrade to it. The reason behind this is, because the custom Rom come with many of customization and tweaks which saves a lot of battery. Even many other tweaks apart from battery tweaks are added to the custom Rom that increases overall performance and reduces battery consumption.

Reverse Tethering On Android..

I am going to tell you about a simple trick that will help you to share your PC Internet connection that you used to connect with your LAN, with your Android phone using USB. Now the first question that will strike in your mind is that what is need of this trick if i can simple tether my internet connection from my Laptop using Connectify or any other software and then simply use that on my android phone by connecting to that WiFi. Yes you can do that but what will you do if you are on PC, that is not having any WiFi. Now you got my point. This trick is very useful if you don’t have WiFi and still wants to share your internet connection.

Reverse tethering i s a process that allows your android phone to connect to the internet of PC using USB. The process is reverse of USB tethering, that’s why it is known as Reverse Tethering.

Requirements

1.) Rooted Android Phone with Superuser installed.
2.) A desktop or laptop with working internet connection.
3.) USB drivers of your Android Phone.

Steps For Reverse Tethering


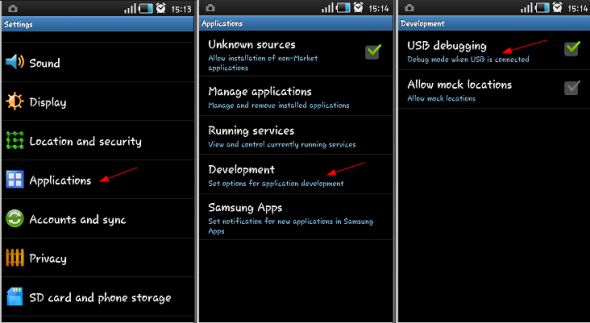
1.) Enable USB debugging in your Android Phone by going Settings>>Application>>Development>>USB Debugging.
2.) Install the drivers of your android phone and connect it to your PC with USB.
3.) Download latest Reverse Tethering Package download.

4.) Extract the downloaded package in a folder.
5.) Now navigate inside the extracted folder and you will see a file named as AndroidTool.exe.
6.) Run AndroidTool.exe and click on Refresh Button that will be given in front of Select a device.
7.) The device connected to the PC will be shown in the spinner in front of Select a device. Choose your Android device from there.
android-reverse-tether
8.) After you select your device in the spinner. Just click on connect. This will install the required files needed for reverse tethering in your android phone.
9.) Now superuser will ask you for your permissions to use USB tunnel. Just allow this.
android-reverse-tether1
10.) If this prompt will not come by itself just open the USB Tunnel application installed on your phone. It will now ask for superuser permissions.
Now if all goes right you will be able to access internet on your android phone.
I am sure that you will like this post. If you like this post then comment below and share with your friends so that they can also get benefit from this post. Don’t forget to share this on social media websites like Facebook and Twitter etc.

                         DROIDISHLUV.BLOGSPOT.IN


Tuesday, February 5, 2013

How to Root the Samsung Galaxy Y GT-S5360 (Easy Method)

The Galaxy Y GT-S5360 has most likely been one of the most economical phones out there, given its specifications and hardware. It’s not much when you take a first glance, but adding Superuser access can enhance the phones quality and let you take advantage of different facets of the Android Universe. Follow the steps below.
1. Download the root file here.
2. Copy this file to your SD card in the root directory (DO NOT PUT IT IN A FOLDER)
3. Switch off the phone.
4. Boot into recovery mode by pressing Volume Up + Lock Button + Home Button at the same time until you see the Samsung boot logo.
5. Touchscreen is disabled in Recovery mode so scrolling is done by the volume keys.
6. Select “Apply Update to SD Card”
7. Find your root file (i.e: update-root.zip) and choose it.
8. It will install the file and you will be asked if you want to reboot your device.
9. Select “Reboot” and wait 5-10 minutes for your device to boot up.
10. If an app called “Superuser” appears your phone is rooted.
(NOTE: This does not work for the Galaxy Y DUOS, PRO or the Galaxy Pocket. This root file is purely for the Samsung Galaxy Y GT-S5360.)

How to root Micromax A110 Canvas 2

You can root Micromax A110 Canvas 2. Micromax A110 Canvas 2 is the successor of Micromax Canvas and it has already been rooted, thanks to Bin4ry’s rooting tool. You can easily root A110 Canvas 2 by following the steps mentioned below.

Disclaimer: Rooting voids your warranty (however you can unroot your device) and can potentially brick your device if you fail to follow the instructions carefully. Follow this guide at your own risk. JailbreakEye will not be responsible if anything goes wrong.
Micromax a110 canvas 2 runs Android 4.0.4. Since Bin4ry’s rooting tool supports all Ice Cream Sandwich and jelly bean android phones, rooting Micromax A110 Canvas 2 should be an ease.

How to Root Micromax A110 Canvas 2

These are the instructions to root A110 Canvas 2 smartphone…
  1. Download and extract this zip file: Root_script_by_Bin4ry_v17.zip
  2. Enable USB debugging on your Micromax A110 Canvas 2. (Go to Settings > Developer Options > Check mark “USB Debugging” and then tap OK button.
  3. Now connect your Micromax A110 to your computer via USB cable. The drivers should be installed automatically or use official Micromax drivers. (or use Pdanet to install drivers)
  4. Go to the folder named “Root_script_by_Bin4ry_v17″ and run the “Runme.bat” file. This should open the command prompt.
  5. Choose the Normal mode by typing ‘1‘ and hit Enter button from your keyboard.
  6. Follow the on-screen instructions to complete the A110 rooting process. Your A110 Canvas 2 will reboot during the process after which Bin4ry will copy some files to your device.
  7. When your phone is back ON, you should find the superuser SU app in your app drawer. If it’s there, your Micromax A110 Canvas 2 have been rooted!
Note: If you ever want to Unroot your Micromax A110, run the runme.bat file again, but this time type “x” instead of 1 and hit enter.

Use VPN Tricks on Android with Feat Vpn- 2013

Most you have have experienced High Speed Internet on Windows platform, Just imagine how better it would be if the same Use VPN Tricks on Android Device. yes this is possible through FeatVPN which Supports OpenVPN and NMD VPN config files on any android Phones and Tablets. So Heavy Internet user’s just follow this steps and then use your VPN Tricks on Androidyou just need to know any working config of your area and needed a Android handset or tablet.

Below Shown method will guide you how to Run your VPN Tricks on Android which runs on Windows. You do not need to root your device to run This VPN.

Features Feat Vpn:

· No need to change the proxy or ports.

· Supports android version 2.2 to 4.2

· Fully free app and procedure

· Can be used with any VPN configs like NMD, Kebrum etc.

· Option to choose different ports from the menu.

· No root access required

How to Use Vpn Tricks on Android:

· First you will need to install this App on your android Device, you can do this by Searching on Google play or from Below Link

· Download Feat VPN from Google Play (Android market)

· Then simply Create a .zip file of your Config just add a Working Config files into a ZIP archive and paste that Zip file into your SD card.

· After downloading this file Install the FeatVPN in Android

Now Click on Tunnels


Click On Add Button


Select the Zip file Created with the config As (I selected RV.zip)
When you select load button you will be navigate to Browse your SD Card, Now Select your .zip file which you created or you can also select direct .openvpn file, but we recommend to put your configuration an pass.txt file in a Zip archive and the select .zip


Click on back and select the config


  It will start connecting


Now you can see the Tunnel connection is initiated and Ready to Connect, If there is no Errors in config files and UDP or TCP port is opened in your area then VPN will start receiving and sending Data.

Done! Now you can use your Working VPN Tricks on Android and taste High Speed intent on your phone too.